Yesterday, I was a guest blogger on Artisan Whimsy for the Jewelry Designers Blog Team. Here is the post in it's entirety. Not familiar with Artisan Whimsy, stop over through the link above and create your own page. There are lots of artistic groups for whatever your interest, and it is a wonderful way to connect to other artists!
In the beginning there was The One Bead...

The One Bead is what started my life as a beader. My husband and daughter gave me the bead for my birthday about ten years ago, and as I tell people, "it is a slippery slope from the first bead to drowning in a house full of beads"!
I chose this topic because as a "Bead Girl" working part time at Julie's Xpression's (a local bead store in Hastings, NE), I often teach beginning beaders the basics to beading.
Newbie Basic Beading Boot Camp:

 (photos courtesy of Fusion Beads)
I have tried to cover the basics and yes, I could go on and on and on about beads and my philosophy behind designing. But this is not about MY beading, this is about getting YOU started on your addiction beading.

In the beginning there was The One Bead...

The One Bead is what started my life as a beader. My husband and daughter gave me the bead for my birthday about ten years ago, and as I tell people, "it is a slippery slope from the first bead to drowning in a house full of beads"!
I chose this topic because as a "Bead Girl" working part time at Julie's Xpression's (a local bead store in Hastings, NE), I often teach beginning beaders the basics to beading.
Newbie Basic Beading Boot Camp:
- If at all possible go to a bead store or find an experienced beader to help you get started. This will help you avoid being overwhelmed by all of the choices available and walk you through the basics. You can certainly learn what you need to know on-line, but having someone teach you one on one is a wonderful experience. I am a visual learner and it is far easier for me to pick up a technique if someone is there to guide and correct me than if I am trying to read about or watch a video on the technique.
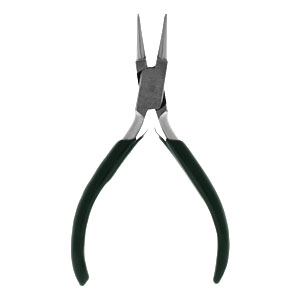
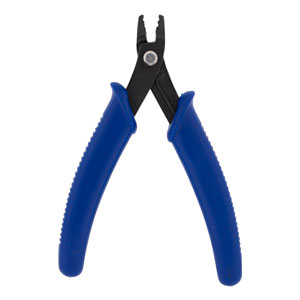
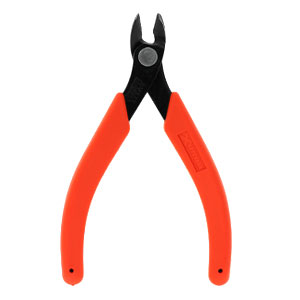
- Buy the best tools you can afford. The tools are going to be with you for some time to come, so spend a bit more to get the better products. The basics I advise starting with are: a crimping tool, a round nose pliers, a flat or chain nose pliers (I prefer the ones with no grooves on the nose so they don't mar your metals), and a good pair of flush cutters for snipping. These are my mainstays. I also use bail making pliers for nice rounded bends, but those can wait until you are a more advanced beader.
- Start with the best foundation materials you can afford. I use only SoftFlex
brand wire because I trust it to hold up to wear and tear. I use the
basic silver color because it really won't matter what color it is when
it is covered with beads and the .014 Diameter, 21 Strands, size. Yes,
it comes in other colors and sizes, but this is the one that will fit a
wide variety of beads and it is more widely available that some of the
other widths and colors. For 99% of my bead stringing projects I use
2x2 crimp tubes made of Sterling Silver. Yes, they come in other colors
(gold, antique brass, gunmetal, copper) and yes I do use them.
However, as a starting beader, go basic. Sterling crimps are extremely
durable and forgiving. They can be bent more than once or twice (which
helps when you are getting started) without falling apart. If you are
doing a beading project in a different color of metal, just add a
coordinating crimp cover to hide the sterling silver crimp.


- When you are starting in beading, choose beads you like and that are of good quality. Another of my favorite sayings is "Cheap beads make cheap jewelry". Anyone can string beads together and call it jewelry. When you "design" jewelry, you put thought and time into your project. You think about the colors and sizes of your beads. I also consider the "comfort" of a design. I am less likely to wear a piece of jewelry that is poking me. Tidy the ends of your wire near the crimp so they are not sticking out or have rough edges on them. I try to run my beading wire back through two or three beads at the end of the length. Not only does this prevent them from poking out, but it gives you an additional length of wire to work with "if something goes wrong" and you have to tear things apart. You can remove a crimp from a design if you do it carefully without totally destroying the wire, and then you have a bit extra length to correct the problem. I also make an effort to look back over my design before I finish off that last crimp. I really get aggravated when I have a project finished and I have one bead out of symmetry. Fine if it is supposed to be asymmetrical, but if it is a "matchy, matchy" design (sides mirroring each other), that one missing or additional bead can be a "blight" to the effect you are working toward.
- Finally, make jewelry that makes you happy. Start a project with beads you like. I am EXTREMELY fond of crystals, and love designs that have sparkle in them. However, if you like or love the beads you are working with, a design will come together far easier than it will if you are uncomfortable with your medium. I have made designs with beads I hated, but it was an unpleasant experience and I don't like to repeat those. If you are spending time doing a hobby that you love, you don't want cursing and black clouds to mar the time you spend with your craft. I find too, that if I love a design, others will too. Granted not everyone shares my tastes, but that doesn't matter if the jewelry makes me happy. I love to use beads that have a story to tell. When my customers are in my booth, I can sell a piece of jewelry with the story those beads tell. Not always, but it happens more often than not. Regardless of my ramblings, stick with the beads you love and others will love what you create.
I have tried to cover the basics and yes, I could go on and on and on about beads and my philosophy behind designing. But this is not about MY beading, this is about getting YOU started on your addiction beading.


No comments:
Post a Comment