Showing posts with label Lindsay Starr. Show all posts

Sunday, November 15, 2015

Beading Back in Time Blog Hop 4 - The Final - Winding Back Time

When you bead and make as much jewelry as I do, you can get burnt out from it.  It is just a true fact that doing something you love can often become monotonous, which I combat with bead embroidery.  I love the freedom that bead embroidery gives me to take an image in my head and make it a reality.  I don't often "see" my projects in completion in my head, but most of them that this happens with, are my bead embroidery pieces.  As I am typing this, the thought of comparing it to a 3D printer came to mind.

Last spring, we visited the new "Shoe Carnival" added to a mall in Hastings to look for shoes for Graduation.  As we were checking out, Chris and Mina spotted these tiny Converse Chuck Taylor baby shoes.  He made me buy them for a beading project.  Of course, since we had discussed me doing a project similar to this it wasn't much of an arm twisting.
So now I had the shoes, what now?  I had to sit them aside for some time to make jewelry for our summer and autumn shows, but Chris continued to put them in my line of sight so they would speak" to me.  I really didn't have a plan for them until our Back In Time Blog Hop, 4th quarter topic was chosen.  Lindsay Starr & Sherri Stokey (our hosts for the blog hop) chose "our favorite time period" for the Hop topic.  My favorite thing to bead around is "Steampunk", granted it is mostly an imaginary time period, but I love the quirkiness of it.  I double checked with the Gals to see if this would count as a time period (though I think I mentioned it after I had already begun my project) and this was Lindsay's reply: Steampunk has inherently historical themes - If someone has a problem with you doing steampunk in a historical challenge send them to me and I'll kick them. If you talk a bit in your post about the historical roots of the genera, I think it would be really cool!  So there it is official permission!


This was one of those projects I spoke of earlier that I can "see" in my mind before I begin.  I did some shopping to find what I would need. I wanted some leather to recover my basic black shoes to make them more authentic to the period.  I found the perfect leather (which I have had tons of compliments on from those who viewed the project in progress) on the Etsy shop PeggySueAlso.

I am so glad I found the shop!  Their leather is beautiful!  I also really appreciated that the descriptions told the thickness of the leather so I would know if it would be flexible and thin enough to stitch through.  The leather has rich colors and the paisley pattern shows up lovely with the gold detailing.  I always go towards these rich colors when I work with Steampunk designs. Other things I purchased for the project are:
Mini Gears designed by Tim Holtz purchased from ArtiqueMixedMedia also on Etsy, the Brass Ox finish top hats, and crystal cup chain came from B'Sue Boutiques (they have awesome Steampunky treasures!), the antique brass finish clock winding keys designed by Tierracast came from Fusion Beads, and the various seed beads, fish leather (used to make the eyelid on the eye cabs) and the Wire Lace all came from Julie's Xpressions in Hastings.  Though I love vintage clock and watch gears, I find that using the Tim Holtz versions are easier to design with.  You can find them in the embellishment section of the scrapbooking department at craft stores.
While waiting for my shopping to arrive, I began with Chris's handmade glass eyeball cabochons.
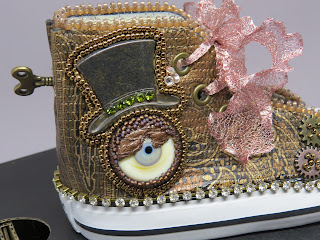
I did most of my component work before I applied it to the shoe.  I can't tell you how much easier this was than it would have been if I had waited and did it all on the shoe!  Once I had the bezel stitched around the eye, I thought it needed an eyelid, but I wasn't sure what to use to make it.  I had some fish leather on my table so I thought I would try that.  I found an edge that was kind of rough and trimmed it down until it was the right size.  I glued it under the beaded edge and to the cabochon.  This worked well, but Chris is not a fan of the one shown in the picture.  I love the "weird" factor it adds to the design though!  When my leather arrived, I cut a piece and trimmed it until it was about the right size and then used that piece as a pattern for the second shoe.  I used Loctite GO2 gel glue to adhere almost all my pieces together.  This was the first time I used it and I am not sure I am a fan.  It did work, but seemed a bit gummier than I am used to with the E6000.  I used GS Hypo Cement to add the crystal cupchain since it has a fine applicator tip.
you can see the eyelet detail on the shoe without the shoestring
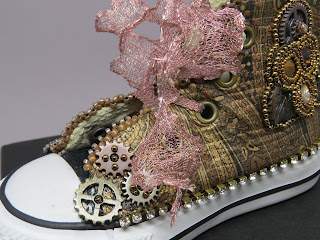
Once the leather was glued to both shoes, I faced a design challenge.  Do I let the silver eyelets for the shoestrings show, cover them to not string shoestrings, or replace them with other eyelets to match the leather.  After some searching, I decided to go with the last choice and replace them with antique brass colored eyelets.  Several years ago, I won a wonderful tool that does both the punching for the holes and the application of the eyelets.  It wasn't a totally smooth transition, as a couple of times I missed the previous hole and made a small hole in a wrong spot, but I soon got the hang of it and managed to replace the eyelets.  I chose not to replace the one next to the toe as it was just too difficult to work in that area (I broke four Tulip needles and seriously maimed a fifth in one night working on this area!).  I had a tough time adding the gears to the edges near the toe and an even more difficult time embellishing them with seed beads.

When I finished the eyelets, I began beading on the shoes.  I did all of my top edging first, followed by the application and embellishment of the eye/hat piece.  At that point I wasn't sure what to add to the second side of the shoe.

When my friend Deb pointed out that I had glued the second eye piece to the wrong side of the second shoe, I was able to peel it up, but it marred the leather a bit.  So I designed this piece using a Galvanized Lucite leaf from The Hole Bead Shop, more of the Tiny Gears, and 3 8 mm Swarovski rivolis in Bronze, Smoked Topaz, and Crystal Golden Shadow.  Mostly, I winged it.  I think it turned out well though, I added seed beads and a crystal button to embellish the gears. To finish off the design I added the winding key to the back and stitched a star design around it so that it looks like I inserted the key to wind the shoe.  To apply the key, I used my handy tool again to punch a hole through the leather but not the shoe, so the key could be glued into the shoe and I could embellish the "keyhole".  It was now time to glue on the cupchain.  I usually stitch on cupchain so it stays put, but there was just no way to sew it that close to the sole.  Once the cupchain was in place, I used the WireLace to make my shoestring.  The color is more of a copper/rose gold color but looks very pink in the photos.  I really am proud of this design!  I still need to finish the second shoe and would like to figure out how to apply a propeller to the toes (also purchased through B'Sue Boutique).

I have the ultimate goal of submitting it to contests, but I have to get all of it complete first!  So far the project has taken me about a month working nearly every evening on it. Thanks for stopping by for all of our Beading Back In Time Blog Hops this year!  If you missed my other pieces, here they are!
PreHuman
Early Human
Early Civilization

Thanks to Sherri & Lindsay for including me in this great Hop Challenge


Saturday, August 1, 2015

Almost But Not Quite...Back in Time Blog Hop Reveal Day

The third round of the Back in Time Blog Hop is here!  Well...not so much HERE exactly.

I have been working hard on my project most of the month, but last week I had carpel tunnel surgery on my right hand and a nerve release on my right elbow.  My recovery was proceeding quite nicely, so much so I over exerted my poor arm on Wednesday, doing things I should have known better than to try yet (YOGA, and it was my first attempt at yoga...dumb, dumb, dumb)! Yesterday the pain management eluded me and now, it is more painful than it was last week after surgery!  (P.S. the surgeon Dr. Dolf Ichtertz, from the Hand & Shoulder Institute in Grand Island and the outpatient surgery staff & nurses at the Memorial Community Hospital in Aurora, NE can not be commended highly enough!!  Chris and I have both received treatment and care above and beyond today's "standards" of care from both the Dr and the Hospital!)
Yes, extreme beading can give you tennis elbow!  I have it in both arms!

Incisions from the carpel tunnel procedure.

So our theme for this go round was Early Civilizations.  I thought about the idea for a bit, and decided to try my hand at making a beaded mask.  While it is not yet finished, I do intend to continue to work on it and hope to have it finished in 2 weeks.  I also want to mention that back in May I was to do a reveal for the Bead Peeps Blog Hop, my partner Lori Allain Blanchard had sent me a beautiful selection of beads, and I am about 3/4 way through that project.  I have plenty of inventory for shows built up through the next few weeks, so I am trying to catch up on my challenge projects that have fallen behind the past couple challenges.

First of all on the mask project, I have to give a tremendous thank you to NanC Meinhardt.  A couple years ago, I was able to take a class on free form right angle weave with NanC and really enjoyed the class.  I knew she had made masks and when I ran into trouble even locating a mask form to work with, I sent a message to NanC on Facebook.  She was very gracious and helpful, and told me to give her a call when I got off work to chat about my project!!  I did and we chatted for about 15 minutes after which, I had a clear picture of what I wanted to do, what I should look for in a mask, and the best way to get started.  It is wonderful to have experienced contacts willing to reach out and lend an ear when you need help!

So here is the mask base I started with.
It measures about 7" x 3.5".  Of course, with any project I tend to get carried away, so I forced myself to work as small as I could.  NanC suggested that if I could not find anything in the size I was looking at, I could buy a doll, take the head off, and create a form either by making a base with polymer clay or by cutting the doll head in half with a saw.  She also suggested that if I found a base that wasn't black to paint it black so that black thread would blend in and not be seen.  I did paint it, but the paint scratched off, so I painted a couple coats of acrylic craft paint on it and then added a coat of Modge Podge.  This helped to save the black from needle nicks, but when I started applying the double stick tape to help form the beads and get them to stay in place, the paint and Modge Podge adhered to the tape and wanted to bubble up or just came off on the tape.  This is the type of double sided tape I used.
Ranger Wonder Tape
I believe you can also find it under the brand of Tacky Tape.  We used it in NanC's class so that was what I looked for.  This looks just the same, is just as sticky, but may be slightly less in the package.  This was found at my local scrapbook store (conveniently located in my local bead store where I happen to work part time!).  It is very sticky and gums up your scissors, just a note of caution, don't use your best scissors to cut it.


So here is the mask.  I am doing an Elemental Mask in an African style.  I used size 8 seed beads to fill the space faster, and plan to do some embellishment on the surface after I finish the seed bead work.  The upper right is blue for water, the lower left is an orange AB finish seed bead for fire, the upper left (just outlined) is white alabaster matte finish for air, and the Earth will be represented by a dark forest green ab matte on the lower right side. I am using several beading stitches, right angle weave, peyote, and square stitch.
This the back which illustrates the starter strip.  I glued down a strip of thin suede lacing along the edge of the back.  This allowed me a base to stitch into for my base row of right angle weave.  I started to do peyote stitch to move over the edge and up the front of the mask.  I divided the mask into the four elements using a metallic marker.  The marker wore off, but I just re-marked it to have my boundaries for the beading.

So there is my third project in the Back in Time Blog Hop, here are the links to the other participants:
Jenny Davies-Reazor:  http://www.jdaviesreazor.com/blog/beading_back_time_blog_hop_ancient_egypt_inspired

Sunday, May 3, 2015

Back In Time Blog Hop...Cave Girl Chic

My life has been a total crazy mess lately.  Too many commitments, too many responsibilities, WAY too much stress, and far too little time to deal with all of it.  But you are not here to hear about all of that!  This is a challenge continuing throughout the year, and it is hosted by Lindsay Starr and Sherry Stokey.

When I was working on my concept, I really wasn't sure which direction to go.  Our theme for this round was "Early Human".  Thank goodness, the Omaha Bead Affair hit at just the perfect time for purchasing the ingredients for this design.  A great amount of my details came from Darcy Horn, The Jade Dog. 
Handmade Polymer from Darcy Horn, The Jade Dog
Darcy is one of my favorite vendors and artists, as her funky style speaks to my artistic tastes!  So I purchased a bunch of these amazing spikes from Darcy (made by her!), some tiny sea urchin spines, and some very pretty Picasso finished size 8 seed beads.  To this mix I added spikes of tumbled picture jasper, Czech glass thorn beads, and some cool snakeskin finish Chinese crystals.  I wanted to make this huge complicated piece, but I just didn't have time and went with the KISS (Keep It Simple Stupid) design philosophy.  Here is what I came up with and I just LOVE it!  I made a matching pair of funky earrings with natural wood beads and of course every Cave Girl's favorite, Swarovski crystals!  No matter what era we live in, we all need to SPARKLE!

Me wearing my creation, bringing out my Inner Cave Girl

The set

the earrings

Details!
Here are the rest of the participants!  Hope you enjoy the Hop!

Sunday, February 1, 2015

Back In Time Blog Hop - Episode 1

Hi!  Long time no blog posts!  We have been busy with college visits, taxes, scholarships, and prom  dress shopping.  Time goes by way too quickly and there are always way to many things to accomplish! 

Speaking of time, I (and Chris helped too) am participating in the Back in Time Blog Hop through a group I was honored to be invited to join.  The group is headed up by Lindsay Starr of Phantasm Creations, and Sherri Stokey of Knot Just Macrame.  They are amazing artists and this was a fun challenge to participate in.

The theme: Back in Time, Pre-Human.  Hopefully, my piece fits that theme!  I started with a piece of this:
source
Chris and I purchased a couple of the very smooth stones last summer in Lincoln at the Haymarket Farmers Market from the Lincoln Rock Shop.  I loved the shape and texture and the bits of fossil in the texture.  I thought I would use it in bead embroidery, but this was the PERFECT challenge for the piece.  I was originally going to wire wrap it, but while the front side looked great, the back was a mess from trying to anchor it on the smooth texture of the stone.  So I channeled one of my favorite artists, Darcy Horn (The Jade Dog), who does amazing things with free form peyote.

Here is my creation:


When I started, Mina suggested I use greens, which I hadn't considered but which worked very well against the smooth gray.  I varied, matte forest green, opaque olive, opaque seafoam lined topaz, matte seafoam ab, and matte metallic gray.  Because we all liked the designs on both sides of the stone, I made the piece reversible.  Side one shows off the fossil design quite nicely near the circle and the back side has interesting designs with the bead work.  I finished the piece with a gorgeous hand dyed cord using kumihimo, and finishing bead cones and a clasp in gunmetal black.

Want to see all the other amazing designs?  Here is the list!

Co-hostess: Lindsay Starr of Phantasm Creations http://phantasmcreation.blogspot.com/
Co-hostess: Sherri Stokey of Knot Just Macrame
http://www.knotjustmacrame.com/2015/01/beading-back-in-time-blog-hop-big-reveal.html
Kelly Rodgers of Beadin' Black & Blue http://beadinblacknblue.blogspot.com/
Michelle McCarthy of Firefly Design Studio http://www.fireflydesignstudio.blogspot.com/2015/01/beading-back- in-time.html
Caroline Dewison of Blueberribeads http://blueberribeads.co.uk/
Melissa Trudinger of Boho Bird Jewellery https://beadrecipes.wordpress.com/
Sue Kennedy of SueBeads http://www.suebeads.blogspot.com/
Stephanie and Chris Haussler of Pixybug Designs You Are Here
Jen Cameron of Glass Addictions www.glassaddictions.com/blog
Jean Wells of Jean A. Wells Artisan Jewelry http://jeanawells.blogspot.com/

Popular Posts