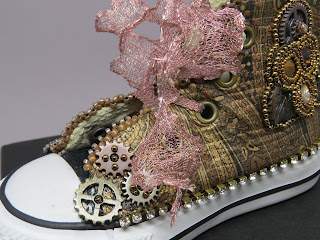
Last spring, we visited the new "Shoe Carnival" added to a mall in Hastings to look for shoes for Graduation. As we were checking out, Chris and Mina spotted these tiny Converse Chuck Taylor baby shoes. He made me buy them for a beading project. Of course, since we had discussed me doing a project similar to this it wasn't much of an arm twisting.
So now I had the shoes, what now? I had to sit them aside for some time to make jewelry for our summer and autumn shows, but Chris continued to put them in my line of sight so they would speak" to me. I really didn't have a plan for them until our Back In Time Blog Hop, 4th quarter topic was chosen. Lindsay Starr & Sherri Stokey (our hosts for the blog hop) chose "our favorite time period" for the Hop topic. My favorite thing to bead around is "Steampunk", granted it is mostly an imaginary time period, but I love the quirkiness of it. I double checked with the Gals to see if this would count as a time period (though I think I mentioned it after I had already begun my project) and this was Lindsay's reply: Steampunk has inherently historical themes - If someone has a problem with you doing steampunk in a historical challenge send them to me and I'll kick them. If you talk a bit in your post about the historical roots of the genera, I think it would be really cool! So there it is official permission!
This was one of those projects I spoke of earlier that I can "see" in my mind before I begin. I did some shopping to find what I would need. I wanted some leather to recover my basic black shoes to make them more authentic to the period. I found the perfect leather (which I have had tons of compliments on from those who viewed the project in progress) on the Etsy shop PeggySueAlso.
I am so glad I found the shop! Their leather is beautiful! I also really appreciated that the descriptions told the thickness of the leather so I would know if it would be flexible and thin enough to stitch through. The leather has rich colors and the paisley pattern shows up lovely with the gold detailing. I always go towards these rich colors when I work with Steampunk designs. Other things I purchased for the project are:
Mini Gears designed by Tim Holtz purchased from ArtiqueMixedMedia also on Etsy, the Brass Ox finish top hats, and crystal cup chain came from B'Sue Boutiques (they have awesome Steampunky treasures!), the antique brass finish clock winding keys designed by Tierracast came from Fusion Beads, and the various seed beads, fish leather (used to make the eyelid on the eye cabs) and the Wire Lace all came from Julie's Xpressions in Hastings. Though I love vintage clock and watch gears, I find that using the Tim Holtz versions are easier to design with. You can find them in the embellishment section of the scrapbooking department at craft stores.
While waiting for my shopping to arrive, I began with Chris's handmade glass eyeball cabochons.
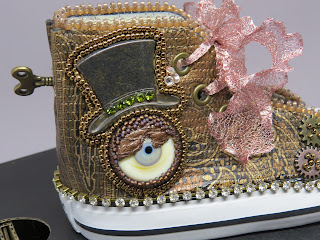
I did most of my component work before I applied it to the shoe. I can't tell you how much easier this was than it would have been if I had waited and did it all on the shoe! Once I had the bezel stitched around the eye, I thought it needed an eyelid, but I wasn't sure what to use to make it. I had some fish leather on my table so I thought I would try that. I found an edge that was kind of rough and trimmed it down until it was the right size. I glued it under the beaded edge and to the cabochon. This worked well, but Chris is not a fan of the one shown in the picture. I love the "weird" factor it adds to the design though! When my leather arrived, I cut a piece and trimmed it until it was about the right size and then used that piece as a pattern for the second shoe. I used Loctite GO2 gel glue to adhere almost all my pieces together. This was the first time I used it and I am not sure I am a fan. It did work, but seemed a bit gummier than I am used to with the E6000. I used GS Hypo Cement to add the crystal cupchain since it has a fine applicator tip.
 |
| you can see the eyelet detail on the shoe without the shoestring |
When I finished the eyelets, I began beading on the shoes. I did all of my top edging first, followed by the application and embellishment of the eye/hat piece. At that point I wasn't sure what to add to the second side of the shoe.
When my friend Deb pointed out that I had glued the second eye piece to the wrong side of the second shoe, I was able to peel it up, but it marred the leather a bit. So I designed this piece using a Galvanized Lucite leaf from The Hole Bead Shop, more of the Tiny Gears, and 3 8 mm Swarovski rivolis in Bronze, Smoked Topaz, and Crystal Golden Shadow. Mostly, I winged it. I think it turned out well though, I added seed beads and a crystal button to embellish the gears. To finish off the design I added the winding key to the back and stitched a star design around it so that it looks like I inserted the key to wind the shoe. To apply the key, I used my handy tool again to punch a hole through the leather but not the shoe, so the key could be glued into the shoe and I could embellish the "keyhole". It was now time to glue on the cupchain. I usually stitch on cupchain so it stays put, but there was just no way to sew it that close to the sole. Once the cupchain was in place, I used the WireLace to make my shoestring. The color is more of a copper/rose gold color but looks very pink in the photos. I really am proud of this design! I still need to finish the second shoe and would like to figure out how to apply a propeller to the toes (also purchased through B'Sue Boutique).
I have the ultimate goal of submitting it to contests, but I have to get all of it complete first! So far the project has taken me about a month working nearly every evening on it. Thanks for stopping by for all of our Beading Back In Time Blog Hops this year! If you missed my other pieces, here they are!
PreHuman
Early Human
Early Civilization
Thanks to Sherri & Lindsay for including me in this great Hop Challenge


